Step by Step Procedure:
1. Lets start creating a dynamic web project by name Spring3MVC as shown in below image.
2. Once we create the dynamic web project we have the skeleton for web app, we need to add the jars under lib folder of WEB-INF required for Spring that are mentioned in the Jars Required Section .
3. You need to add the below entries in your web.xml to configure theDispatcher servlet of spring
<display-name>Spring3MVC</display-name>
            <servlet>
    <servlet-name>spring</servlet-name>
    <servlet-class>
  org.springframework.web.servlet.DispatcherServlet
  </servlet-class>
  <load-on-startup>1</load-on-startup>
         </servlet>

     <servlet-mapping>
 <servlet-name>spring</servlet-name>
 <url-pattern>*.action</url-pattern>
      </servlet-mapping>
if you observer the above XML code servlet name is specified as spring which means the spring container will search for the spring-servlet.xml for loading the beans and other spring specific configurations.
4. Create a file with name spring-servlet.xml under WEB-INF folder and copy the below XML content to that file.
<?xml version="1.0" encoding="UTF-8"?>
<beans xmlns="http://www.springframework.org/schema/beans"
 xmlns:xsi="http://www.w3.org/2001/XMLSchema-instance" xmlns:mvc="http://www.springframework.org/schema/mvc"
 xmlns:p="http://www.springframework.org/schema/p" xmlns:context="http://www.springframework.org/schema/context"
 xsi:schemaLocation="http://www.springframework.org/schema/beans
http://www.springframework.org/schema/beans/spring-beans-3.0.xsd
http://www.springframework.org/schema/context
http://www.springframework.org/schema/context/spring-context-3.0.xsd
http://www.springframework.org/schema/mvc
http://www.springframework.org/schema/mvc/spring-mvc-3.1.xsd">

 <context:component-scan base-package="com.sample.spring3mvc.controller" />

 <bean id="viewResolver"
  class="org.springframework.web.servlet.view.UrlBasedViewResolver">
  <property name="viewClass"
   value="org.springframework.web.servlet.view.JstlView" />
  <property name="prefix" value="/WEB-INF/pages/" />
  <property name="suffix" value=".jsp" />
 </bean>

 <bean id="productFacade"
  class="com.sample.spring3mvc.facade.impl.ProductFacadeImpl">
 </bean>
 <bean id="productDao"
  class="com.sample.spring3mvc.dao.impl.ProductDaoImpl">
 </bean>
 <mvc:annotation-driven />
 <mvc:annotation-driven>
  <mvc:message-converters>
    <bean class="org.springframework.http.converter.json.MappingJacksonHttpMessageConverter"></bean>
  </mvc:message-converters>
</mvc:annotation-driven>
</beans>
5. Explanation of Entries in spring-servlet.xml
<context:component-scan base-package="com.sample.spring3mvc.controller" /> : This entry will tell spring container where the controller classes are available, all the files/packages under the above package will scanned for controllers.
viewreolver bean used to configure the prefix path and suffix extension of the views returned, so that we dont need to return these values in controller.
<mvc:annotation-driven> : This entry is required if we are going to use any annotations in the bean classes. For example @Autowired.
<mvc:message-converters>
<bean class="org.springframework.http.converter.json.MappingJacksonHttpMessageConverter"></bean>
</mvc:message-converters>
The above entry is required for automatic conversion of normal objects to JSON when @Responsebody is used in any of the controller method which we will see in the later parts of the tutorial.
The rest of the entries are just beans that we gonna use in application.
With this we are done with the configuration part and now we jump into real coding stuff.
Java and JSP Coding
Create a index.jsp and place it under WebContent/webroot folder and the content would be something like this.
<html>
<head>
    <title>Spring 3.0 MVC Series: Index - </title>
</head>
<body>
    <a href="home.action"> Home</a>
</body>
</html>


    The below jsp would be a simple one if you do not want the Datatable in it.


 Create home.jsp under Web-INF/pages with the below content


  <%@ taglib prefix="c" uri="http://java.sun.com/jsp/jstl/core"%>

<!DOCTYPE html>

<html>

<head>

<link

 href="//datatables.net/download/build/nightly/jquery.dataTables.css"

 rel="stylesheet" type="text/css" />

<script src="http://code.jquery.com/jquery-1.9.1.min.js"></script>
<script
 src="//datatables.net/download/build/nightly/jquery.dataTables.js"></script>

<meta charset=utf-8 />
<title>Spring MVC -DataTables Example</title>
</head>
<body>
 <div class="container">
  <h2>Directly Loaded Data and added Datatable after load</h2>
  <table id="example" class="display" width="100%">
   <thead>
    <tr>
     <th align="left">Name</th>
     <th align="left">Color</th>
     <th align="left">Price</th>

    </tr>
   </thead>

   <tfoot>
    <tr>
     <th align="left">Name</th>
     <th align="left">Color</th>
     <th align="left">Price</th>
    </tr>
   </tfoot>

   <tbody>
    <c:forEach items="${products}" var="product">
     <tr>
      <td>${product.name}</td>
      <td>${product.color}</td>
      <td>${product.price}</td>
     </tr>
    </c:forEach>
   </tbody>
  </table>
 </div>

 <div class="container">
  <h2>Loaded Data through ajax after page Load</h2>
  <table id="example1" class="display" width="100%">
   <thead>
    <tr>
     <th align="left">Name</th>
     <th align="left">Color</th>
     <th align="left">Price</th>

    </tr>
   </thead>
   <tbody>
    <tr>
     <td></td>
     <td></td>
     <td></td>

    </tr>
   </tbody>
  </table>
 </div>
</body>

<script>
 $(document).ready(function() {

  var table1 = $('#example').DataTable();
  var table2 = $('#example1').DataTable({
   "ajax" : "${pageContext.request.contextPath}/getAllProds.action",

  });
 });
</script>
</html>


If you observe in the above code we are directly referencing the javascript files it works only if u have internet connection. If you have downloaded those javascript files you can refer it locally as well.
Datatable usage in Spring Explanation


In the above jsp code i gave two examples for Datatable
                 I. Applying Datatable to already loaded HTML table with id example1, the js code for this is as simple as $('#example').DataTable();
                II. In the second case we are directly loading data using an ajax call associated with Datatable which is  $('#example1').DataTable({
  "ajax":"${pageContext.request.contextPath}/getAllProds.action"});
                 but for doing the above step the data returned from the controller should be in a particular form of JSON as suggested in the site, which is done using getJSONForProd  method in the controller and returning aaData  from the controller.

 For Live Examples on Datatables you can go here Live Datatables Example.


Controller Code
   Create a Controller with name HomeController.java and use the below code.
   ProductData is just a POJO .

   productFacade.getAllProducts() will return list of ProductData  which u can just mock it.
package com.sample.spring3mvc.controller;

import java.util.Collection;
import java.util.Collections;
import java.util.HashMap;
import java.util.List;
import java.util.Map;

import org.springframework.beans.factory.annotation.Autowired;
import org.springframework.stereotype.Controller;
import org.springframework.ui.Model;
import org.springframework.util.CollectionUtils;
import org.springframework.web.bind.annotation.RequestMapping;
import org.springframework.web.bind.annotation.ResponseBody;
import org.springframework.web.servlet.ModelAndView;

import com.sample.spring3mvc.data.ProductData;
import com.sample.spring3mvc.facade.ProductFacade;


@Controller
public class HomeController {

    @RequestMapping("/home")
    public ModelAndView helloWorld(final Model model) {
        model.addAttribute("products",productFacade.getAllProducts());
        return new ModelAndView("home", "message", model);
    }
    @Autowired
 private ProductFacade productFacade;

    @ResponseBody
    @RequestMapping("/getAllProds")
 public Map<String, Object[]> getAllProducts()
 {
     List<ProductData> aaData= productFacade.getAllProducts();
  return Collections.singletonMap("aaData", getJSONForProd(aaData));
 }

    /**
     * I only want certain product info..
     */
     public Object[] getJSONForProd(Collection<ProductData> prods){
         Object[] rdArray = new Object[prods.size()];
         int i = 0;
         for(ProductData u:prods){
             // [ name, id,arn,groups ]
             Object[] us = new String[]{u.getName(),u.getColor(),Double.toString(u.getPrice())};
             rdArray[i] = us;
             i++;
         }
         return rdArray;
     }
}
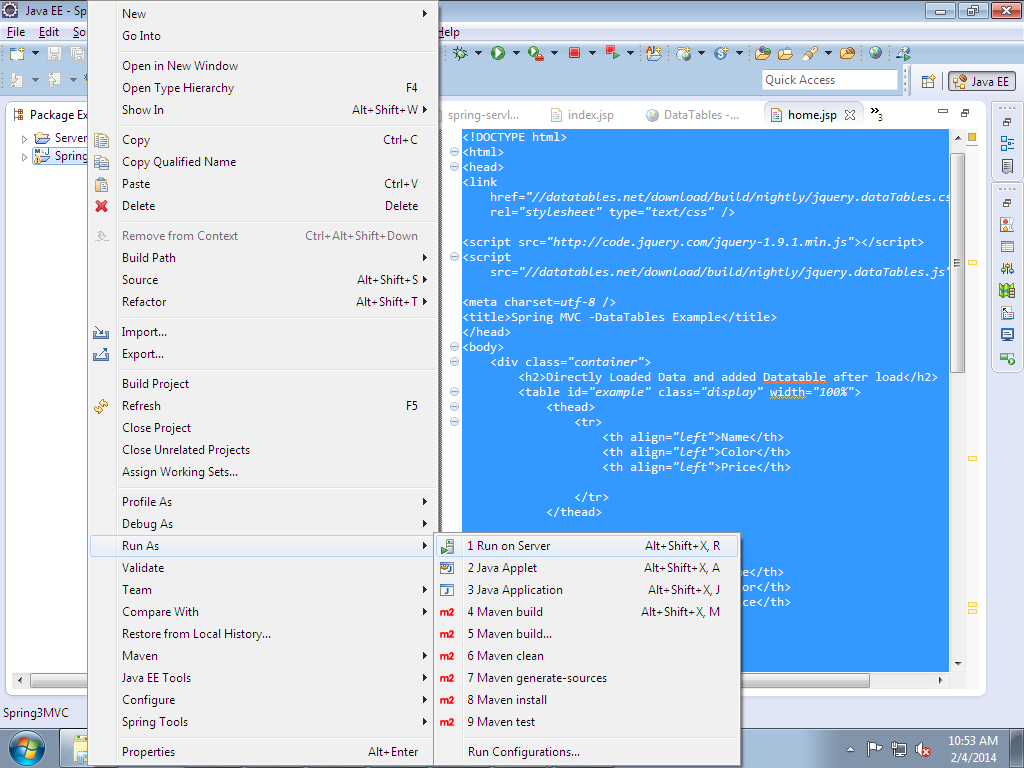
Run the application on server
Once all the above steps are completed successfully you run the application by right clicking on the application as shown below
 |
| Run on server |
Once you run you can see the associated server will start and then you can key in the below link in any of the qualified browser ex:Chrome and test: http://localhost:8080/Spring3MVC/
In case of any doubts/clarifications/Suggestions you are welcome @vinaytaj2006@gmail.com
.png)
.png)

